1.什么是GIT
GIT是一个分布式版本控制系统(Version Control System,VCS)。版本控制是一种在开发中用于管理和备份对文件、目录、工程内容的修改,以方便查看历史记录和恢复以前版本的软件工程技术。
2.安装GIT
(1)在Linux系统安装GIT
apt-get install git
3.GIT常用命令
(1)获取GIT仓库
获取GIT仓库有两种方法。第一种是在现有项目或目录中导入所有文件到GIT;第二种是从一个服务器克隆一个现有的GIT仓库
1)在现有目录中初始化仓库
如果打算使用GIT来对现有项目进行管理,只需要进入该项目目录并输入以下命令:
root@ebs-26932:/git_test# git init
Initialized empty Git repository in /git_test/.git/
2)克隆现有仓库
如果想获得一份已经存在的GIT仓库的复制品,要用到get clone命令。Git克隆的是该GIT仓库服务器上几乎所有数据,而不是仅仅复制完成工作所需要的文件。当执行git clone命令的时候,默认配置下远程GIT仓库中的每一个文件的每一个版本都将被拉取下来。克隆仓库的命令格式为git clone [url]
root@ebs-26932:/git_test# git clone https://github.com/StormPuck/API-test
Cloning into ‘API-test’…
remote: Enumerating objects: 39, done.
remote: Total 39 (delta 0), reused 0 (delta 0), pack-reused 39
Unpacking objects: 100% (39/39), done.
root@ebs-26932:/git_test# ll
total 16
drwxr-xr-x 4 root root 4096 Jun 2 12:04 ./
drwxr-xr-x 26 root root 4096 Jun 2 12:00 ../
drwxr-xr-x 3 root root 4096 Jun 2 12:04 API-test/
drwxr-xr-x 7 root root 4096 Jun 2 12:00 .git/
这会在当前目录下创建一个名为API-TEST的目录,并在这个目录下初始化一个.git文件夹,从远程仓库拉取下所有数据放入.git文件夹,然后从中读取最新版本的文件的复制品。如果进入这个新建的libgit2文件夹,会发现所有的项目文件都已经在里面了,准备就绪等待后续的开发和使用。如果想在克隆远程仓库的时候自定义本地仓库的名字,可以使用下列命令
root@ebs-26932:/git_test# git clone https://github.com/StormPuck/API-test local-git
Cloning into ‘local-git’…
remote: Enumerating objects: 39, done.
remote: Total 39 (delta 0), reused 0 (delta 0), pack-reused 39
Unpacking objects: 100% (39/39), done.
root@ebs-26932:/git_test# ll
total 20
drwxr-xr-x 5 root root 4096 Jun 2 12:07 ./
drwxr-xr-x 26 root root 4096 Jun 2 12:00 ../
drwxr-xr-x 3 root root 4096 Jun 2 12:04 API-test/
drwxr-xr-x 7 root root 4096 Jun 2 12:00 .git/
drwxr-xr-x 3 root root 4096 Jun 2 12:07 local-git/
这将执行与上一个命令相同的操作,不过在本地创建额仓库名变成了local-git
(2)记录每次更新到仓库
得到了一个GIT仓库后,要对仓库中的文件进行操作,并在操作完成时提交更新到仓库
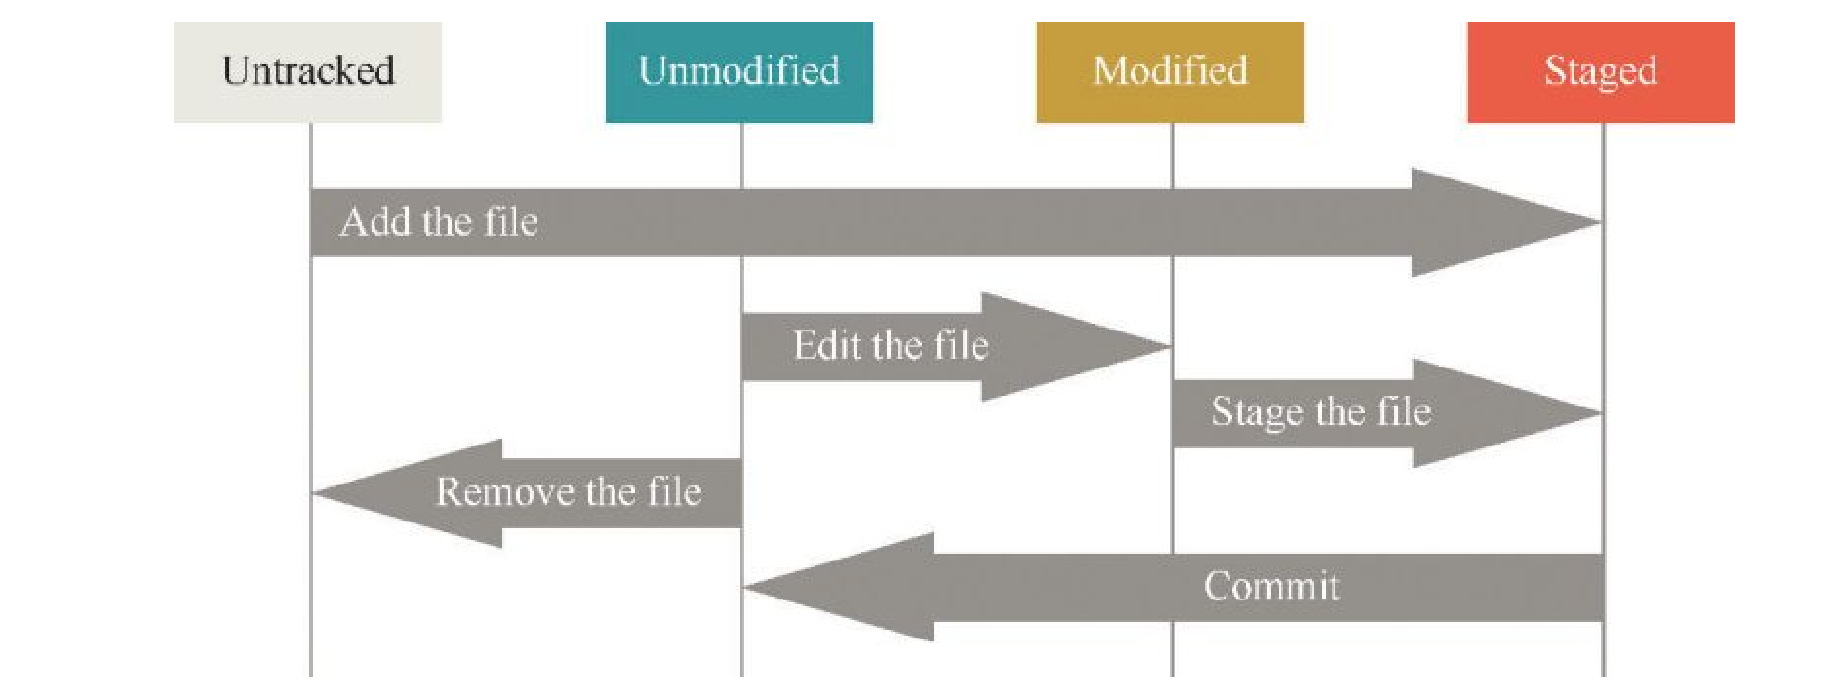
请记录,工作目录下的每一个文件都不在乎两种状态:已跟踪或未跟踪。已跟踪的文件是指那些被纳入版本控制的文件,在上一次快照中有他们的记录,在工作一段时间后,他们的状态可能处于未修改、已修改或已放入暂存区。工作目录中除已跟踪文件以外的所有其他文件都属于未跟踪文件,他们即不存在上次快照的记录中,也没有放入暂存区。初次克隆某个仓库的时候,工作目录中的所有文件都属于已跟踪文件,并处于未修改状态。
编辑过某些文件之后,由于自上次提交后对他们做了修改,GIT将他们标记为已修改文件。逐步将这些修改过的文件放入暂存区,然后提交所有暂存了的修改,如此反复。所有使用GIT时文件的生命周期如图所示:
1)检查当前文件状态
要查看当前工作区处于什么状态,使用git status。如果克隆仓库后,不做任何修改,使用此命令,可以看到类似如下的输出:
root@ebs-26932:/git_test/local-git# git status
On branch master
Your branch is up to date with ‘origin/master’.
nothing to commit, working tree clean
这说明现在的工作区相当干净,换句话说,所有已跟踪文件在上次提交后都未被修改过。此外,上面的信息还表明,当前工作区没有出现任何未跟踪状态的新文件。另外,命令还显示了当前所在的分支为master
现在,在工作区创建一个新文件README,使用git status命令,将看到如下信息:
root@ebs-26932:/git_test/local-git# git status
On branch master
Your branch is up to date with ‘origin/master’.
Untracked files:
(use “git add <file>…” to include in what will be committed)
README
nothing added to commit but untracked files present (use “git add” to track)
在状态信息中可以看到新建的README文件出现在untracked files下面。未跟踪的文件意味着GIT在之前的快照中没有这些文件;GIT不会自动将之纳入跟踪范围,除非明明白白的告诉他“我需要跟踪该文件”,这样的处理让用户不必担心将生成的二进制文件或其他不想被跟踪的文件包含进来。
2)跟踪新文件
用户可以使用GIT ADD命令跟踪一个新文件,下面的语句可用来跟踪README文件
root@ebs-26932:/git_test/local-git# git add README
root@ebs-26932:/git_test/local-git# git status
On branch master
Your branch is up to date with ‘origin/master’.
Changes to be committed:
(use “git reset HEAD <file>…” to unstage)
new file: README
3)提交新文件
使用 git commit -m “message”命令来提交变更的文件。这里使用命令 git commit -m”add README file”将文件README提交到仓库
root@ebs-26932:/git_test/test# git commit -m”test add new file”
[master (root-commit) 3308a7b] test add new file
1 file changed, 0 insertions(+), 0 deletions(-)
create mode 100644 README
然后使用git status命令查看状态信息
root@ebs-26932:/git_test/test# git status
On branch master
Your branch is based on ‘origin/master’, but the upstream is gone.
(use “git branch –unset-upstream” to fixup)
nothing to commit, working tree clean
可以看到工作目录是干净的,没有东西需要提交
4)修改文件
可以使用vi命令来修改README文件,保存退出,再次使用git status查看状态
root@ebs-26932:/git_test/test# git status
On branch master
Your branch is based on ‘origin/master’, but the upstream is gone.
(use “git branch –unset-upstream” to fixup)
Changes not staged for commit:
(use “git add <file>…” to update what will be committed)
(use “git checkout — <file>…” to discard changes in working directory)
modified: README
no changes added to commit (use “git add” and/or “git commit -a”)
Git add命令更新要提交的文件
root@ebs-26932:/git_test/test# git add README
root@ebs-26932:/git_test/test# git status
On branch master
Your branch is based on ‘origin/master’, but the upstream is gone.
(use “git branch –unset-upstream” to fixup)
Changes to be committed:
(use “git reset HEAD <file>…” to unstage)
modified: README
变更添加到暂存区,可以使用git add添加到暂存区,或者使用git commit -a命令跳过暂存区,直接将变更添加到仓库
root@ebs-26932:/git_test/test# git commit -m”add a sentence”
[master 22b4a74] add a sentence
1 file changed, 1 insertion(+)
再次更改README文件,然后使用git commit -a命令跳过暂存区,直接提交到仓库
root@ebs-26932:/git_test/test# git commit -a
[master f5c488e] commit 22222
1 file changed, 1 insertion(+)
5)丢弃工作区变更
再次编辑README文件,添加33333,使用git status查看状态信息
root@ebs-26932:/git_test/test# git status
On branch master
Your branch is based on ‘origin/master’, but the upstream is gone.
(use “git branch –unset-upstream” to fixup)
Changes not staged for commit:
(use “git add <file>…” to update what will be committed)
(use “git checkout — <file>…” to discard changes in working directory)
modified: README
no changes added to commit (use “git add” and/or “git commit -a”)
由于添加的句子写错了,想放弃本次变更,使用git checkout命令进行
root@ebs-26932:/git_test/test# cat README
the first change!
2222222
33333
root@ebs-26932:/git_test/test# git checkout — README
root@ebs-26932:/git_test/test# cat README
the first change!
2222222
6)丢弃暂存区变更
如果修改了文件,并且通过git add命令提交到了暂存区,想回退编辑该怎么办呢?
root@ebs-26932:/git_test/test# git add README
root@ebs-26932:/git_test/test# cat README
the first change!
2222222
4444444
使用 git reset HEAD README
root@ebs-26932:/git_test/test# git reset HEAD README
Unstaged changes after reset:
M README
再次查看状态信息,发现已经回到了git add之前的状态
root@ebs-26932:/git_test/test# git status
On branch master
Your branch is based on ‘origin/master’, but the upstream is gone.
(use “git branch –unset-upstream” to fixup)
Changes not staged for commit:
(use “git add <file>…” to update what will be committed)
(use “git checkout — <file>…” to discard changes in working directory)
modified: README
no changes added to commit (use “git add” and/or “git commit -a”)
7)丢弃本地仓库变更
如果修改了文件,还提交到了本地仓库,想回退怎么办呢?方法是使用git log命令,查看下仓库提交历史信息,具体如下:
root@ebs-26932:/git_test/test# git log
commit 3eab5f11babad9b9a83de99c2f80ecfd2955d29c (HEAD -> master)
Author: liulibo <232835701@qq.com>
Date: Sun Jun 2 14:02:12 2019 +0000
55555
commit f5c488e9d3d214f5f976ece829d0f08c725e4eba
Author: liulibo <232835701@qq.com>
Date: Sun Jun 2 13:45:45 2019 +0000
commit 22222
commit 22b4a74c2728f444225b5e1dd914ce9c8e86c164
Author: liulibo <232835701@qq.com>
Date: Sun Jun 2 13:44:11 2019 +0000
add a sentence
commit 3308a7b643f83869e99912a35f5dbbff2201d5e1
Author: liulibo <232835701@qq.com>
Date: Sun Jun 2 13:29:43 2019 +0000
test add new file
Git log命令显示从最近到最远的提交日志,可以看到4次提交,最近一次是“555555”,最早一次是“test add new file”。需要提示的是,commit id上一个按本就是HEAD^,上上个版本就是HEAD^^回退到“22222”就可以使用git reset命令:
root@ebs-26932:/git_test/test# git reset –hard HEAD^
HEAD is now at f5c488e commit 22222
可以看到回退成功,下面查看README文件的内容
root@ebs-26932:/git_test/test# cat README
the first change!
2222222
再用git log命令查看下版本信息
root@ebs-26932:/git_test/test# git log
commit f5c488e9d3d214f5f976ece829d0f08c725e4eba (HEAD -> master)
Author: liulibo <232835701@qq.com>
Date: Sun Jun 2 13:45:45 2019 +0000
commit 22222
commit 22b4a74c2728f444225b5e1dd914ce9c8e86c164
Author: liulibo <232835701@qq.com>
Date: Sun Jun 2 13:44:11 2019 +0000
add a sentence
commit 3308a7b643f83869e99912a35f5dbbff2201d5e1
Author: liulibo <232835701@qq.com>
Date: Sun Jun 2 13:29:43 2019 +0000
test add new file
可以看到之前的5555这个最新版本已经不存在了,如果想撤销回退怎么办?那么需要找到5555版本的commit id:3eab5f11babad9b9a83de99c2f80ecfd2955d29c
然后使用下面的命令,回到指定版本:
root@ebs-26932:/git_test/test# git reset –hard 3eab5f11babad9b9a83de99c2f80ecfd2955d29c
HEAD is now at 3eab5f1 55555
查看文件内容,果然回到了5555版本
root@ebs-26932:/git_test/test# cat README
the first change!
2222222
5555555
8)删除文件
先按照前面的操作新建一个文件hello.txt,并提交到仓库。然后假设某一天不想要该文件了,于是在本地将其删除
root@ebs-26932:/git_test/test# ll
total 16
drwxr-xr-x 3 root root 4096 Jun 2 14:12 ./
drwxr-xr-x 6 root root 4096 Jun 2 13:28 ../
drwxr-xr-x 8 root root 4096 Jun 2 14:13 .git/
-rw-r–r– 1 root root 0 Jun 2 14:12 hello.txt
-rw-r–r– 1 root root 34 Jun 2 14:10 README
通过rm命令删掉hello文件
root@ebs-26932:/git_test/test# rm hello.txt
root@ebs-26932:/git_test/test# ll
total 16
drwxr-xr-x 3 root root 4096 Jun 2 14:13 ./
drwxr-xr-x 6 root root 4096 Jun 2 13:28 ../
drwxr-xr-x 8 root root 4096 Jun 2 14:13 .git/
-rw-r–r– 1 root root 34 Jun 2 14:10 README
现在可能有两个选择,第一种是删错了,由于版本库还有该文件,所以可以使用git checkout命令将其找回
root@ebs-26932:/git_test/test# git checkout — hello.txt
root@ebs-26932:/git_test/test# ll
total 16
drwxr-xr-x 3 root root 4096 Jun 2 14:15 ./
drwxr-xr-x 6 root root 4096 Jun 2 13:28 ../
drwxr-xr-x 8 root root 4096 Jun 2 14:15 .git/
-rw-r–r– 1 root root 0 Jun 2 14:15 hello.txt
-rw-r–r– 1 root root 34 Jun 2 14:10 README
第二个选择,确实想从版本库删除该文件,那么使用下列命令
root@ebs-26932:/git_test/test# git status
On branch master
Your branch is based on ‘origin/master’, but the upstream is gone.
(use “git branch –unset-upstream” to fixup)
Changes not staged for commit:
(use “git add/rm <file>…” to update what will be committed)
(use “git checkout — <file>…” to discard changes in working directory)
deleted: hello.txt
no changes added to commit (use “git add” and/or “git commit -a”)
root@ebs-26932:/git_test/test# git commit -a -m”delete hello.txt”
[master def85c6] delete hello.txt
1 file changed, 0 insertions(+), 0 deletions(-)
delete mode 100644 hello.txt
4.搭建GITLAB
GITLAB是GIT开源本地解决方案,对于想保密又不愿花钱的团队来说,这是一个良好的解决方案
(1)安装和配置必要的依赖项
(2)添加GITLAB包存储库并安装包
添加GITLAB包存储库的语句如下:
root@ebs-26932:~# curl https://packages.gitlab.com/install/repositories/gitlab/gitlab-ce/script.deb.sh | sudo bash
接下来,安装GITLAB包,将URL替换为将来你想访问GITLAB的地址。安装将自动配置并在该URL启动GITLAB
root@ebs-26932:~# sudo EXTERNAL_URL=”访问url” apt-get install gitlab-ce